*Disclaimer, and terms of service: This site and the owners of this site, Beach Cities Software, LLC, claim no responsibility for any loss, damages, or injury that you may receive from following the instructions in this post. By continuing to read this post, you agree to hold, Beach Cities Software, LLC, and it’s owners, heirs and all related parties, harmless and, furthermore, you agree that there is no warranty or representation of safety, or functionality, represented here. This is merely a description of a possible means to automate ones garage door, and you assume full responsibility for how you use this information.
Now that that’s out of the way…this is part 1 of a several part, post about using an Arduino based controller, with a built-in accelerometer, wirelessly, paired with Raspberry Pi, to create your own home automation for your garage door. Specifically, in this first post, I’ll explain how to get a garage door monitor running on a Raspberry Pi, which will communicate with a Punchthrough – Light Blue Bean Arduino-based board, that has BLE (Bluetooth) radio, as well as an accelerometer, and several other sensors, built-in. The Light Blue Bean is a great prototyping-board for home automation projects, because it gives you so much to work with out-of-the-box. In addition to the accelerometer, the Bean also has an RGB LED, and a temperature sensor, so it would be easy to also monitor your garage’s temperature. TODO: add this to the sketch and set on scratch characteristic #3.
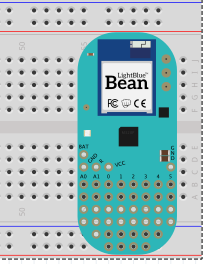
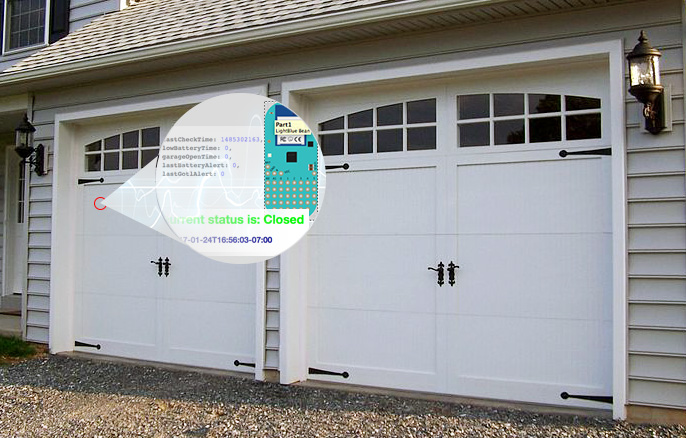
The next post will follow-on, and we’ll post the code for the Arduino/LBB sketch, but if you’re already way ahead of me, simply mount your Bean on your garage door vertically, as pictured. Note that the breadboard is not required, I stuck mine in an envelope, and stapled it to the garage door with a staple gun. Feel free to use tape, or some better means. The Bean is self-contained for the purpose of this post, and doesn’t need any additional components, or wires, despite it’s many available GPIO pins.
So if you are standing facing your garage door, while it is closed, you should see this. Then the calculation to determine whether the garage is open or closed is all tied to the z-axis of the accelerometer. Check back for the code download, and subsequent posts.
In progressive posts, we’ll also cover, how to tie this garage monitoring in with the ability to control (open/close) the garage door from a secure web page, on your local Wifi network, or your web site if you wish. This way, if you ever forget your garage door opener, or only have one of them, you can always use your phone to get on the Wifi, from outside your house, and then access the secure web page, and open your garage. In a follow-up article, I will release code, for an iOS app that will make things even more secure, with finger-print verification, BUT we’re getting WAY ahead of ourselves now, so let’s just start with what’s up next.
Getting Started
To follow along with post, you will need the following: (links for these coming soon)
- A Raspberry PI running some version of Raspbian, and basic knowledge of using the command line
- This USB Wifi Adapter, configured with an active network, or one that you know is compatible with your Pi
- This USB BLE Adapter, preferably active, in the Pi, while installing the Raspbian OS. If you did not have the BLE adapter in while installing Raspbian, you may need to install bluez manually.
Note: This adapter, is available other places, but unless you already have one, get the one from AdaFruit, so you know it has the static mac address feature. - A Light Blue Bean, (not the Bean+) or some other Arduino with BLE, temperature, and an accelerometer built-in, but you’ll have to adapt the Arduino sketch to suit your needs
- Any RPi compatible USB-to-micro-USB cable and power supply. And spare surge protector if you have one.
- A Handful of CR 2032 CV coin-cell batteries, or you can solder leads onto the battery and ground terminals of the Bean, and supply it with 2 AA batteries
- Arduino IDE, and Bean Loader software, installed, and basic understanding of them. At least try out a few examples and be familiar.
- Sunfounder 2 Channel Relay
- Various Wires
- Breadboard
- Cold-weather / outdoor zip ties
- Staple Gun (optional) – You need some way to mount the Bean to garage without damaging it. Get creative, or just put it in an envelop to get started, and staple THE ENVELOPE, not the Bean to the garage. I plan to put mine into a plastic case eventually. The bean sips power, so heat isn’t a concern for a few days in an envelope, especially if you live in a cold-weather location. In general, though we recommend the bean be mounted in a breathable plastic encasement, or just in the open if moisture and dust, are not a concern.
Setup the Raspberry Pi
The assumption here is that the Raspberry Pi, is already configured and running Raspbian. If you need help getting to that point, please search the web, as there are tons of examples for available. Additionally, you should also have the wifi setup on the Raspberry Pi, so that it automatically re-connects, when it reboots. You will need to place this RPi in the garage, permanently, so I recommend using an older model; I had a old B+, that was collecting dust since I started using the v3 B+, which is so much faster. So I used the old B+ model, and it is perfect for the task, although a bit slow during some of these installation steps, so be patient if you’re on a less powerful model.
#!/bin/bash
# from the command terminal enter the following commands
sudo su
apt-get update
apt-get upgrade
apt-get install -y msmtp lighttpd php5-common php5-cgi php5 uuid-runtime
lighty-enable-mod fastcgi-php
chown www-data:www-data /var/www
chmod 775 /var/www
sudo usermod -a -G www-data pi
service lighttpd restart
# try going to http://the.ip.of.rpi/ in a browser now
vim /etc/msmtprc # add contents (see below), save, restart
# setup mod_auth for lighttpd (see perl script below for generating password)
vim /etc/lighttpd/conf-available/05-auth.conf # add contents (see below), save, restart
lighttpd-enable-mod auth # enable the mod
service lighttpd restart
service lighttpd status
# get a uuid to use as a filename for later
uuidgen -r
d1de7ec3-ceb1-4a94-aa8f-44adf5898fc1 # output will be different, but similar, save this for later, or remember this command
# TODO: finish
Configuring lighttpd for Auth and Email Alerts
Since security should be a concern, anytime you’re adding electronic access to an entry-way to your home. We’re going to setup some very basic authentication on the lighttpd server, however I recommend that you harden this authentication, by installing a SSL certificate, if you plan to use it, in a busy neighborhood. Additionally, if you have not already changed the password for the pi user, that should be changed to something secure as well. Finally, we’ll setup email, so that we can use msmtp to send email alerts, when the garage door has been opened, opened for too long, and closed. We’ll also send an email alert if we fail to connect to the Bean, which can mean that the battery has died or is too low, and needs to be replaced.
Communication with the Light Blue Bean
There are several different approaches you could take to add additional functionality with the Bean, including it’s built-in iBeacon BLE profile/capabilities. However, to keep it simple this post will simply use the built-in “scratches” from the Bean. The Light Blue Bean conveniently includes 5 scratch characteristics that can be easily accessed via standard BLE gatt commands. This means that we can simply store values into these 20-byte, “buckets” of data in our Arduino/Bean sketch, and the RPi can read them using gatttool over the installed BLE adapter.
If you’re new to BLE stuff, think of the scratch characteristics simply as a 20-byte buffer, where you can store some data, or a “scratchpad” of sorts. As an example, the RPi could also set these characteristics using gatttool , and thereby store some data on the Bean that could be discovered via BLE. I’ll show an example of this, by storing the IP address of the RPi, in one of the scratch characteristics. Additionally, we’ll store the temperature, in the garage, and the current garage door open/close status, in two more, respective scratches.
BLE Scan and Querying BLE GATT Characteristics
The first thing to do is to do a LE scan, to find the mac address of the Bean, so that we can query it directly. Do that, by executing the following command. Let it run, for a few seconds, then hit, Ctrl+C , to stop it, or it will go on forever.
hcitool lescan
You should see a bunch of lines of output, containing mac addresses. You’re looking for a mac address that has a OUI (i.e., starts-with) 78:A5:04: , as this tells us that it’s the Bean (most likely). Once you have the full mac address, you can query the scratch characteristics of your Bean with the following command.
gatttool -b 78:A5:04:00:00:00 --char-read -a 0x0033 # or use handle: 0x0037, 0x003B, 0x0043
Analyzing the Data
The default output should look like this:
$ gatttool -b 78:A5:04:00:00:00 --char-read -a 0x0033
Characteristic value/descriptor: 00 00 00 00
This contains 4 bytes of data, represented as hexidecimal. If it were 01 00 00 00 , this would indicate that the value 1 had been passed, due to the big endian, byte-ordering. So you see this data will need to be manipulated in certain circumstances, but it is simple enough to get from the command line, and any general purpose programming language, like PHP, as well. I’m going to be using PHP for this post, to query and read this data, but I could’ve easily accomplished the same thing with a dozen other languages/platforms on the RPi. So use whichever language you prefer, since the concepts are fairly elementary.